Rage Click
Segment Event Filter
The “Rage Click” segment filter allows you to search proactively for users and their sessions with friction points such as rage clicks. You no longer need to watch all available sessions for a single user to determine if the user had a smooth user journey in your digital product.
Definition
A rage click occurs when a user performs multiple quick clicks on the same element in a row. Among the possible explanations are:
-
The user does not understand which is a clickable element;
-
Buttons, links, and icons do not function properly;
-
Unable to click because of the invisible overlay above everything;
How to configure
Our third main event filter in the Segments dashboard is Rage Click. Click on the filter icon and follow the steps described below.
Img1: Rage Click in Segments filters popup
The event filter “Rage Click” is available with 3 options: Anything, CSS selector, and Text. Check the image below.
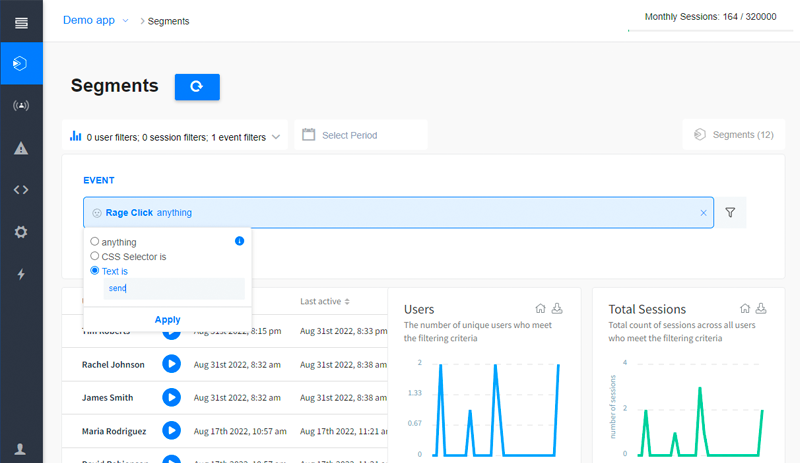
Img2: The event filter "Rage Click" with 3 radio options
Consider the following example: your product is CRM software. You are aware that there is a problem with email sending, more specifically the button “Send“ does not work always since the most recent release version. If you want to check how many users have been affected, one of the ways is to use our event filter “Clicked Element”. However, this will display all users who have clicked this button, both successfully and unsuccessfully. You will then need to go through all sessions to identify which users, are experiencing this problem. For this case, it will much more convenient to use our segment filter “Rage Click”. Select it and define for radio option “Text is“: send as shown above. The option is case-insensitive and works with an exact match (need to define the whole text on the element). Then look over the results after the search. Only one user has encountered the problem.
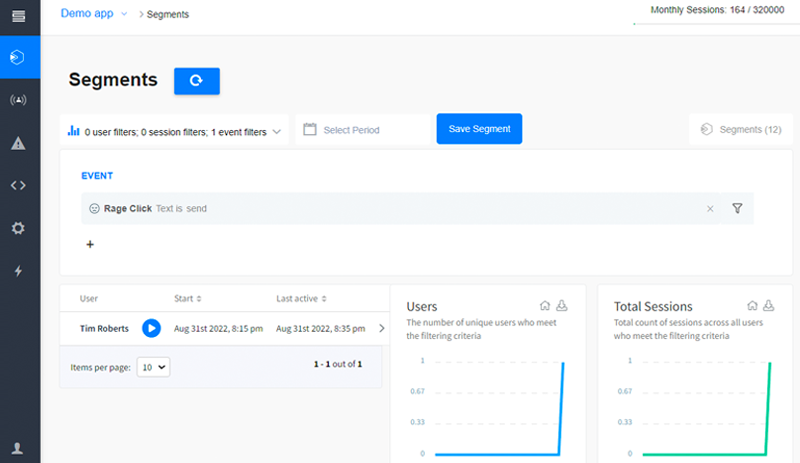
Img3: One user with rage clicked on the “Send” button
To examine which is the exact session of the user with rage press on the “>”. In the right-side panel, all sessions of the user are listed in chronological order from the most recent to the first available session and those ones which meet the search criteria are marked with the label: “matching“. In our case, just one session out of three matches the "Rage Click" criterion. This can be viewed in the image below.
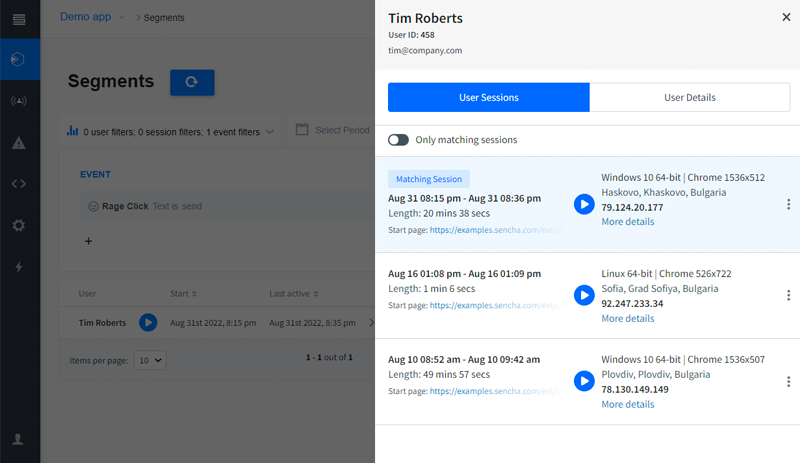
Img4: One matching session for the “Rage Click” filter
Rage Click events in Session Player
In order to spot the rage clicks performed by your user, no need to go through the whole session, just select the related rage click events. They are easily recognizable by color and icon. The rage clicks are marked with a special icon and yellowish color as shown below.
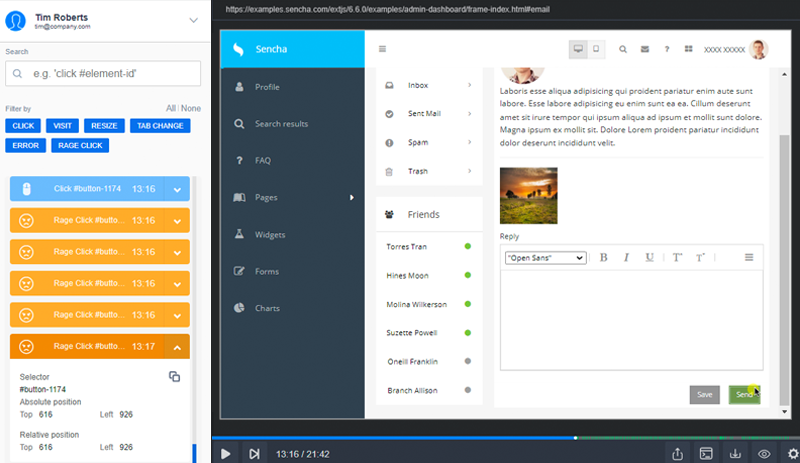
Img5: Rage clicks are shown in the event time steps in the session player on the left
When to use option "anything" for the segment filter Rage Click
It might be the case: that you are unaware of any existing issues with your product and simply want to see if there are any frustration points for your customers. This can be examined by the “Rage Click” with the option “anything“. Using this combination will list you all users with rage clicks. By going through the matching sessions, you may spot some interesting patterns which can be examined further:
-
How frequently does a particular rage click occur?
-
How many users are affected?
This can be achieved by copying the CSS selector for the element that you are interested in and then using the CSS string for the configuration of the filter “Rage Click”. The process for obtaining a CSS selector for an element is analogous to that for the "Clicked Element" filter. For more details on how to use CSS selectors, check the Clicked Element documentation
After the configuration is applied then you can explore the first two trends: Users and Total Sessions for getting the answer to the questions.
Rage Click with Contextual filter
The Contextual filter may be used in conjunction with the main segment event filter Rage Click . This will search for rage clicks performed on a specific page. How to set a Contextual filter read in this section of our documentation.
Img6: Rage Click with the Contextual filter
Rage Click chart
The Rage Click chart in our Segments dashboard helps you:
- First and foremost, determine whether your users perform rage clicks;
- Second, if there are rage clicks, which elements are causing the most frustration;
- Third, how many users have been affected by this;
- Last but not least, which are the pages causing the rage clicks
Rage Click chart
Another useful feature of our new chart Rage Click is the ability to quickly and easily create a user segment. To do this, simply click the unique “Add Filter” icon for any row that you believe merits more examination. You may do this to see which users rage clicks on a particular element, to view their matching sessions, or to look at the remainder of the User trends for those users.
Check the image below for more details.
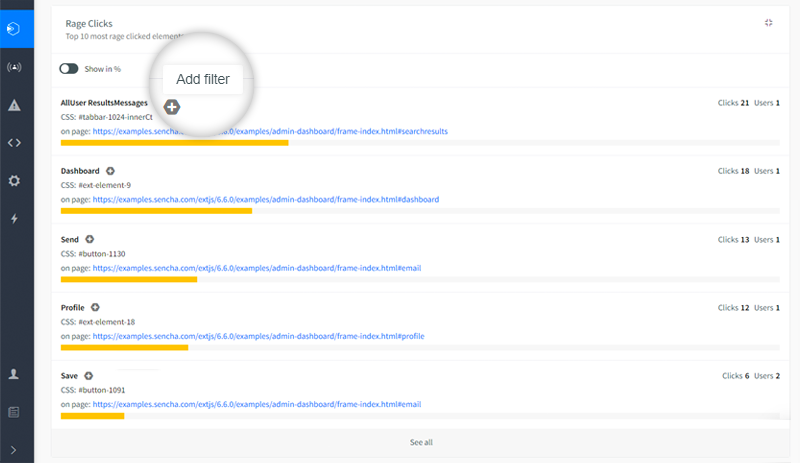
Rage Click chart - "Add filter" option
Custom settings for excluding HTML elements from the tracking for event Rage Click
Sometimes the rage click can be misleading. For example, the user is clicking on a pagination element for the previous/next page. In order to exclude such false positive instances of rage clicks, this can be done by adding a setting for that particular element to be excluded from tracking for a rage click. This can be configured in the Rage clicks section of project settings by specifying the CSS selector of the HTML element to be excluded.
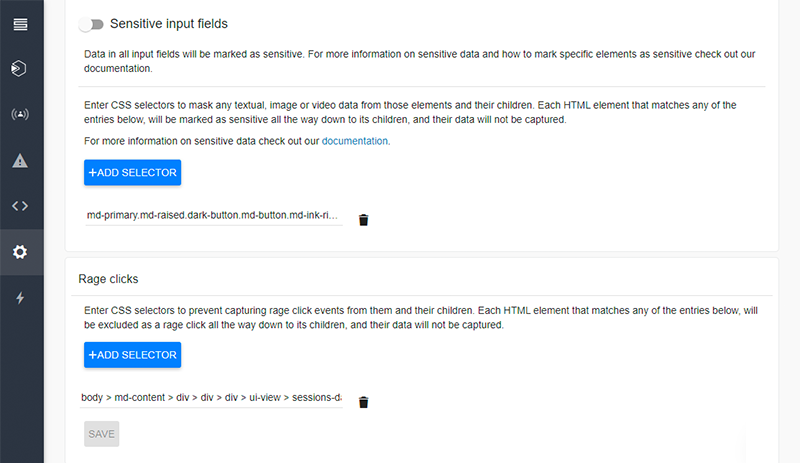
Img7: Rage Clicks elements exclusion settings
Updated 4 months ago
How to use Clicked Element and get the CSS selector for an HTML element
